Master the Art of Perfect ID Photography
Why Professional Photo Quality Matters
Your ID photo is the most scrutinized element of any identification document. Modern verification systems use advanced AI algorithms to detect authenticity, making professional quality essential for acceptance.
Government agencies, financial institutions, and security systems employ sophisticated photo analysis technology. Photos that don't meet professional standards are immediately flagged and rejected, causing delays and complications.
- Pass automated verification systems
- Meet international standards
- Avoid processing delays
- Ensure document acceptance

Camera & Equipment Setup
Foundation for professional results
Smartphone Camera
Modern smartphones (iPhone 12+, Samsung Galaxy S20+, Google Pixel 5+) provide excellent quality for ID photos when used correctly.
- 12+ megapixels minimum resolution
- Clean lens surface (use microfiber cloth)
- Use rear camera for better optics
- Disable digital zoom (crop instead)
- Enable HDR mode if available
Digital Camera
DSLR or mirrorless cameras provide the highest quality with professional control over settings.
- 16+ megapixels recommended
- 50mm equivalent lens (portrait lens)
- Manual exposure control
- RAW format for best quality
- Manual focus for precision
Stability & Support
Camera stability is crucial for sharp, professional photos. Even slight movement creates noticeable blur.
- Tripod or stable phone stand
- 3-5 second timer to prevent shake
- Remote shutter or voice command
- Image stabilization enabled
- Multiple shots for selection
Perfect Background Setup
Create the ideal backdrop for your photo
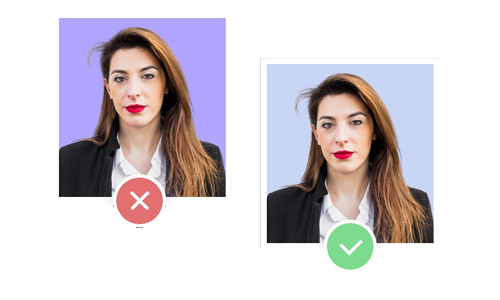
Professional Standard
- Plain white or light gray
- No shadows or textures
- Even, consistent color
- Smooth, clean surface
- Proper distance from subject
Common Mistakes
- Patterned or textured walls
- Visible objects or furniture
- Strong shadows on background
- Dark or colored backgrounds
- Wrinkled or dirty surfaces
DIY Background Solutions
Home Setup Options
- Clean white wall - Most accessible option
- White bedsheet - Stretched tight and wrinkle-free
- Poster board - Large white foam board from office stores
- Photography backdrop - Professional seamless paper
- White projector screen - Smooth, even surface
Setup Guidelines
Quality Checklist
- Background is completely wrinkle-free
- No visible seams or joints
- Even color throughout frame
- No shadows cast on background
- Clean surface free of marks or stains
Professional Lighting Setup
Master the most critical element of photography
Lighting determines the success or failure of your ID photo. Poor lighting creates shadows, alters skin tone, or makes photos look unprofessional and suspicious to verification systems.
Lighting Principles
Natural Light (Preferred)
Position yourself facing a large window with soft, indirect sunlight. This provides the most natural and flattering illumination.
- Best time: Mid-morning (10 AM - 12 PM)
- Avoid: Direct sunlight, late afternoon
- Weather: Overcast days provide softer light
Artificial Light Setup
Use soft, diffused lighting from multiple angles. Professional photography lights or high-quality LED panels work best.
- Color temp: 5500K-6500K (daylight)
- Position: 45° angle from camera
- Diffusion: Softbox or umbrella modifier
Key Light Placement
Position your main light source at eye level to create natural-looking catchlights and minimize unflattering shadows.
- Height: Same level as your eyes
- Distance: 3-4 feet from subject
- Intensity: Bright but not harsh
- Overhead ceiling lights (create eye shadows)
- Backlighting (darkens face completely)
- Direct camera flash (harsh shadows, red-eye)
- Mixed color temperatures (unnatural skin tone)
- Insufficient light (grainy, noisy photos)
- Single-point lighting (dramatic shadows)
- Fluorescent lights (green color cast)
DIY Lighting Solutions
- Ring light (18" or larger)
- White poster board reflectors
- LED panel lights with diffusion
- Large window + white wall opposite
Perfect Facial Expression
Professional appearance and positioning
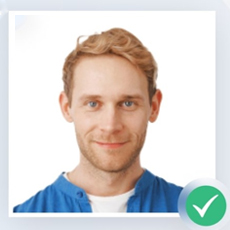
Professional & Natural
- Relaxed, neutral expression
- Eyes open and clearly visible
- Mouth closed or subtle smile
- Looking directly at camera lens
- Head straight and centered
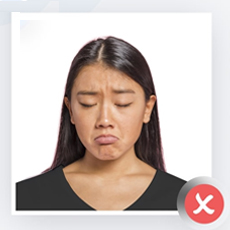
Unprofessional Mistakes
- Wide smiles showing teeth
- Frowning or serious scowls
- Eyes closed or squinting
- Head tilted or turned sideways
- Exaggerated expressions
Expression Guidelines
The Perfect Look
-
Eyes
Open naturally, looking directly at the camera lens. Both eyes should be clearly visible and at the same level.
-
Mouth
Closed or very slight smile. Natural expression without showing teeth or forcing a smile.
-
Posture
Head straight, shoulders square to camera. Face should fill 70-80% of the frame height.
Pro Photography Tips
Common Positioning Errors
- Looking slightly off-camera
- Head tilted to one side
- One shoulder higher than the other
- Face too close or too far from camera
- Hair covering eyes or face
Clothing & Appearance Guidelines
Professional dress code and grooming standards
Clothing Requirements
Color Guidelines
- Recommended: Navy blue, black, dark gray, burgundy
- Solid colors only - no patterns, stripes, or logos
- High contrast with background color
- Avoid: White, cream, light gray with white background
- Never: Bright neon colors, metallic fabrics
Professional Style
- Collared shirts or conservative blouses
- Business casual or formal attire
- Well-fitted, not too tight or loose
- Conservative necklines
- Clean, wrinkle-free clothing
Strictly Prohibited Items
- Any hats, caps, or head coverings*
- Sunglasses or tinted eyewear
- Face masks or mouth coverings
- Work uniforms or branded clothing
- Tank tops, strapless, or revealing clothing
- Large jewelry or distracting accessories
- Costume or character clothing
*Religious head coverings may be acceptable with proper documentation and pre-approval
Professional Grooming Checklist
- Hair neat and not covering eyes or eyebrows
- Natural makeup (avoid heavy application)
- Minimal, non-distracting jewelry
- Well-groomed facial hair (if applicable)
- Clean, professional appearance overall
- Prescription glasses OK (non-reflective lenses)
Photo Dimensions & Technical Requirements
Precise specifications for professional acceptance
Technical Specifications
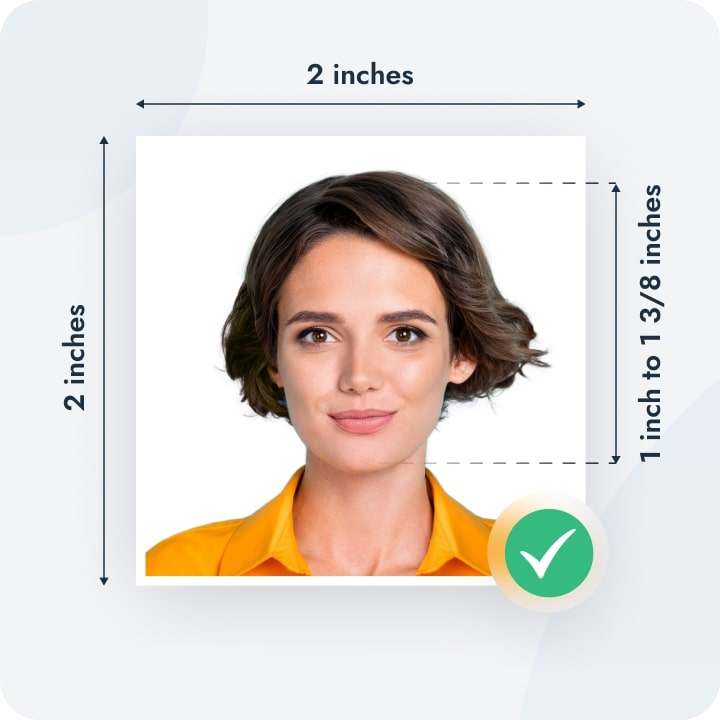
| Specification | Requirement | Notes |
|---|---|---|
| Print Size | 2" × 2" (51 × 51 mm) | Standard ID photo size |
| Digital Resolution | 600 × 600 pixels min | Higher resolution preferred |
| DPI/PPI | 300 DPI | Professional print quality |
| Head Size | 1" to 1⅜" (25-35mm) | 70-80% of photo height |
| File Format | JPEG (.jpg) or PNG | JPEG recommended |
| File Size | 240KB - 12MB | Not too compressed |
| Color Mode | RGB Color (24-bit) | Full color depth |
Recommended Photo Editing Tools
Online Tools (Free)
Professional online tools specifically designed for ID photo formatting:
-
123PassportPhoto.com
Automatic cropping and resizing for ID photos with templates
-
ID Photo 4 You
Professional ID photo templates for various countries
-
PassportPhoto.online
AI-powered background removal and formatting
Desktop Software
Professional desktop applications for advanced photo editing:
-
Adobe Photoshop
Industry standard with precise cropping and color correction
-
GIMP (Free)
Professional open-source photo editor with full features
-
Adobe Express
Simplified editing with built-in ID photo templates
File Preparation Checklist
Before Editing
- Original photo is sharp and well-lit
- Face is properly positioned and centered
- Background is clean and uniform
- No shadows on face or background
After Editing
- Dimensions are exactly 2" × 2" at 300 DPI
- Head size occupies 70-80% of height
- File saved as high-quality JPEG
- File size between 240KB - 12MB
Essential Dos and Don'ts
Critical points for success
-
Take multiple shots
Capture 8-12 photos to choose the best one. Slight variations in expression and positioning matter.
-
Use proper lighting setup
Soft, even illumination on your face from eye level. Avoid harsh shadows or overexposure.
-
Keep eyes open and visible
Look directly at the camera lens. Both eyes must be clearly visible and unobstructed.
-
Maintain proper posture
Head straight, shoulders square to camera. Face centered in frame.
-
Check technical requirements
Verify file size, dimensions, and format before submission.
-
Use selfie mode or arm's length
Selfies distort facial proportions and look unprofessional. Use timer or helper.
-
Wear prohibited accessories
No hats, sunglasses, heavy jewelry, or anything that obscures your face.
-
Over-edit or filter the photo
Filters, heavy retouching, and digital alterations are easily detected and rejected.
-
Rush the photography process
Take time to set up properly. Rushed photos always show poor quality.
-
Use poor quality equipment
Webcams, old phones, or low-resolution cameras produce unacceptable results.
Frequently Asked Questions
Expert answers to common photography questions
Final Quality Checklist
Ensure perfect results before submission
Pre-Photography Setup
Post-Photography Review
Ready to Create Your Professional ID?
Apply these professional techniques and get a premium quality ID document that meets all international standards and verification requirements.
Join over 50,000 satisfied customers who trust IDBook for premium quality identification documents